Sunday, 6 June 2010
Update
The right arm is looking a bit funky, need to go back over it and clean it all up, but here it is.
Updated timings
Once again not finished. Have taken 5 frames off of the down and added them to the up to make it look like more of a struggle.
Shot15
Right this is not a finished version, but i want feedback on this before i progress any further on it.
Saturday, 5 June 2010
Shot 25
This simple little shot has probably caused me the most grief to create out of all the scenes i've animated.
I've really had to play it carefully to the camera, because the character and design and the motion there is quite a bit of behind scenes mesh through mesh. If the camera is going to be changed on this shot i advise its done very VERY carefully - this isn't a shot that can be easily changed or fixed.
Dunno how well you can make it out in this playblast but ive added quite a bit of shake in his body and legs which works really nicely.
Edit: Lookin back over this im not happy with it, its looking far too plane and needs something more, will make some changes.
Take 3
Have reduced the amount of the lean when he goes foward and have moved the keyframe round a bit so he holds the down a teeny (2frames) longer, this makes the movement look more forceful and purposeful.
Shot 19
Shot 19 for feedback.
Very limited to what i could put in the first 30 odd frames of this seeing as he has to be bending over, so i just added a small sigh in preperation for the lift.
Friday, 4 June 2010
Shot 21
Righty shot 21. Sarah's animation which i've just taken off of stepped and done a quick clean up. Only thing i've added to this scene is is a down position at the very beginning. Personally im a lil bit unsure of the timings of the punch, its seems a little rushed to me, however im not gonna make any changes to it unless instructed too.
Shot 19 is taking longer than it should. Something in the scene file is causing it to crash every 10 mins or so, i've had a bit of a root around but cant find anything wrong so im just soldiering on with it, should be done early tomorrow.
Thursday, 3 June 2010
shot 35 feedback
- not keen on the shake out after Macho breaks out of the pot, it just doesnt fit with the moment or his character to be honest. I think this moment requires a much more grrrrrr to triumphent moment as he breaks free from the pot, as if yeah ive done it again, i wwwwiiiiiiiinnn to add to the arrogance of his character. He hasn't realised what he's done yet. He could almost go into one of his muscle poses after breaking free.
- Hero does not look devastated as we pan over to him. His true love has been killed in a exploding pot incident and he seems so casual. He needs to be like in the animatic, almost paralyzed in shock, hands covering mouth the works....
- Similarly, Macho is too casual when comes over. He needs to look shocked himself otherwise it wont be funny when he then changes to the oooo sod it, whatever shrug off. He needs to be more awkward, as if he's about to explain away what he's done but in the end he cant be bothered.
-Hero thinking is nice but i don't think the smile suits him as it makes him look evil...yes its a quite twisted thing he does but i think the thought then cut to the credits its a better cliff hanger/moment of anticipation for the audience compared to an evil grin which will throw them off kilter to who they have previously known to be a cute, sweet character.
-Only other points would be there still seems a lot of symmetry with the arms in Macho, just a bit more offset will break up the animation here.
Monday, 31 May 2010
Shot 22
Whilst making the compilation of my animations for my degree CD i noticed that in shot 22 (where Macho pushes Hero over) Macho doesn't make proper contact during the push, where i cleaned up the walk cycle to stop any slipping the rig had moved slighlty out of place.
Its probably not something that you see on first viewing because its only sight, but its still enough to worry me.
I've fixed this in the animation and up-d it to the Adrive (which is working again today) called shot22-revised. If we have time it would be worth re rendering it.
Its probably not something that you see on first viewing because its only sight, but its still enough to worry me.
I've fixed this in the animation and up-d it to the Adrive (which is working again today) called shot22-revised. If we have time it would be worth re rendering it.
Sunday, 30 May 2010
Adrive
Might just be my end but for some reason i can't connect to the Adrive. Everytime i try to go to the website i get that "problem loading page, server not found" message.
Is this happening to anyone else?
Is this happening to anyone else?
Saturday, 29 May 2010
Shot 13
Matt
Yesterday, it became apparent that Hero Gnome was at two different scales. Tom assured me (since the shots were his animations) he hadnt accidentally scaled the character. I went through the versions of Hero Gnome and this is the result...
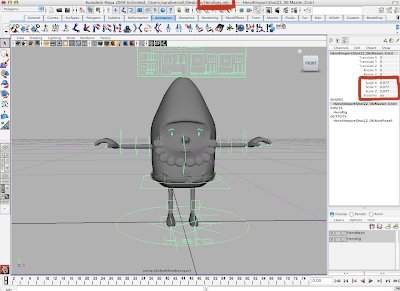 this is my original model for download compared to the model all 3 of us sat down together and chose the scale for.
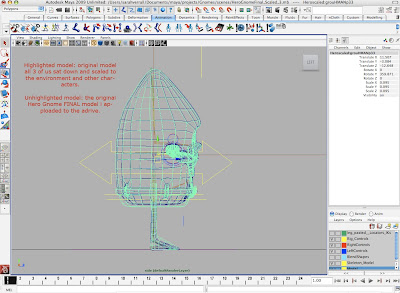
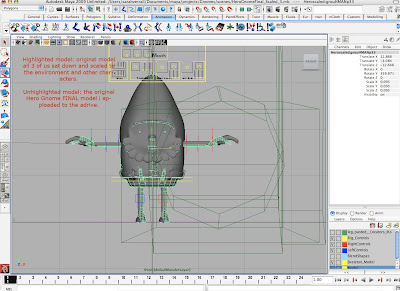
this is the downloadable character you added eyes to compared to the final scaled character size we all agreed on.
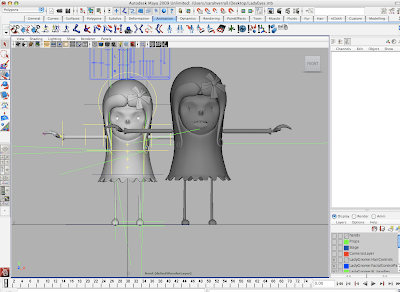 and this is the original downloadable rig i uploaded to the adrive for the animators to use compared to the set scaled model of lady gnome
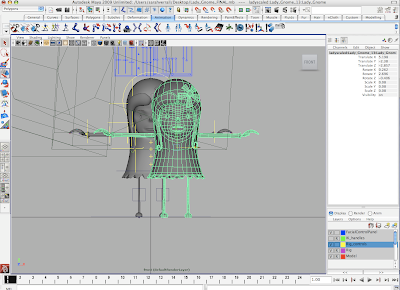
this is the downloadable model after you had updated the characters UVs....
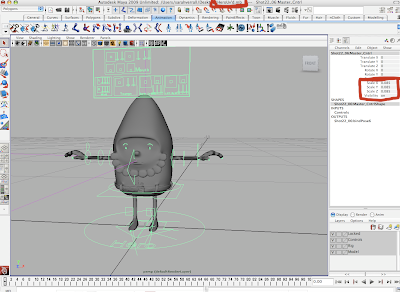 this is the downloadable model after you changes to the eyes....
 this is the downloadable model after you changes to the eyes....
 this is my original model for download compared to the model all 3 of us sat down together and chose the scale for.

This is a render of shot 11 and shot 5 which are exactly the same camera shot but obvious Hero Gnome is at two different scales. One is with the original model with UVs sorted and the other with the eyes you sorted out.
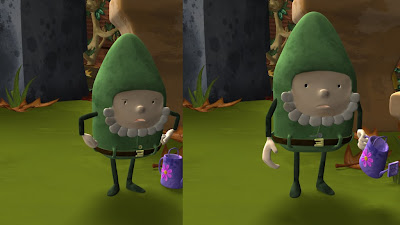 Im now in the process of checking all the characters scales and Macho Gnome has already got 2 different sets of scales of 0.047, 0.044. I now have to check all the lady gnomes scales. This is wasting my time and delaying the films progression. Shot 23 and 24 Macho is scaled at 0.047 and this was animated by you and tom ritchie. Its not likely tom ritchie changed the scale of the characters and so it is coming back to you here.
 Im now in the process of checking all the characters scales and Macho Gnome has already got 2 different sets of scales of 0.047, 0.044. I now have to check all the lady gnomes scales. This is wasting my time and delaying the films progression. Shot 23 and 24 Macho is scaled at 0.047 and this was animated by you and tom ritchie. Its not likely tom ritchie changed the scale of the characters and so it is coming back to you here.
 The rendered and composited work we've achieved could now be useless because of this and everything be redone.
EDIT
Lady Gnome update...
this is the downloadable character you added eyes to compared to the final scaled character size we all agreed on.
 and this is the original downloadable rig i uploaded to the adrive for the animators to use compared to the set scaled model of lady gnome
Guys....
Hey guys, hand in is finally done but there's still just over a week until the show so lets keep up the momentum for the film.
Adam, thanks for sorting out the film disc with me yesterday, couldnt have done it without you. Cheers for the message, i'll check out those updates as soon as you upload. College is not open to us this weekend (went in...swiftly told to leave) so we'll be sorting out issues at home and hopefully still have some to blast through on the farm/maxs machine come tuesday...with any luck we might still be able to tap into maxs machine from here and send some stuff through....will keep you up to date on it.
Matt, incase you didnt get my text, i need proper versions of some of your playblasts. Yesterday you told me you'd increased the time on shot 35 to accommodate macho and hero thinking whereas the playblast i have is so quick with macho skidding on and off this cant be the right one. I need it fully plotted for correct times otherwise im gonna be wasting Romans time fitting the music to something that will get stretched again. Also you only gave me half a second of shot 13. I need full completely blocked versions of these tonight so i can get the new version to him this weekend so he has the time to stretch the music to the animation. The timings are crucial not necessarily having complete animations.
thanks
Sarah
Tuesday, 25 May 2010
Animation
Please bring in/email me playblasts of all animation so i can compile into a new animatic to send to our composer for timing etc. Need these by 11am on Friday 28th May
Thanks
Sarah
Thanks
Sarah
This weeks objectives...
Adam
Rendering (full): shot 3, 6, 8 (boulder textures to come) check cameras, texture assignments and bumps etc.
Rendering (Occlusion and ZDepth): 20, 29 (shot 5 to come shortly)
Assign colours to the background houses, elements and props. Use exported shrubs from the local directory and the grass texture. Make sure you use the small textures of 500x500. You may want to make a new version of 100x100 as we dont see them close at all and would save on rendering time.
Matt
Finish Animating: 13, 16.
Take over Animation: 18
Animate: Shot 35 Macho Breaking out of the pot as well as Hero and the crushed lady Gnome (we can import after so dont worry about placement, waiting for pot etc)
Tom S W
Upload Shot 9 to the Adrive account finished animations directory
Animate: shot 11, 37
Tom R
Finish shot 25
Animate: 7, 35
Clym
Upload shot 28, 31 to the adrive (remove any previous old versions)
Finish Animation: shot 12
Alex Bax
Add pebble animation to lit shot 30
Finish shot 10
Animate shot 14
Mel
Animate shot 15, 17
Fahran
UV map the tree
Sarah
Snail texture creation
Tree texture creation
Finish animation shot 19, 21
Compile playblasts into animatic
Alterations to Hero and Lady Gnome textures.
Complete Fishing rod and Mushroom textures
Saturday, 22 May 2010
Matt
Please can you upload Heros original texture files (psd, tiff, whichever uncompressed format you have) to the adrive as i need to make a few tweaks and need a copy of all original textures at hand for myself and Adam.
Please also update me on shot 3, 6 and 8 progress/completion as these have lighting ready and can be setup for render.
Tom has uploaded shot 29 to the adrive in finished animations. Please check the model matches your final UVs and has the correct eyes and upload to the Ready for Render folder by the end of the day.
Thanks
Sarah
Wednesday, 19 May 2010
Guys
Can we make sure that we sign off of the Adrive if your not using it. The novelty of chucking people off of it has worn off and now its just getting tedious.
Tuesday, 18 May 2010
this weeks objectives
Matt
Finish shot 3, 6, 8.
Animate shot 13, 16
Tom SW:
Animate shot first half of 1, 2, 5 and 9
Clym:
Adjustments to shot 28, 31
Animate shot 12
Tom R:
Finish shot 25
Alex:
Animate shot 30, 10
Sarah and Adam - light, dress, texture, render, composit.
NB:// Matt - toms shot 33 is not on the adrive, please upload this with the eyes so we can proceed with the character occlusions.
Shot 02
Hero Gnome appears from behind the flower pot, walks towards his weed and begins watering it happily... Camera is just temporary
Monday, 17 May 2010
Shot 29 improved stone throw
Heres shot 29 where the hero gnome flicks the stone into the flower pot being lifted by macho gnome. It changed the angle of the throw and the direction by which is flies...
Friday, 14 May 2010
Ready for Render.
Right spent most of today cleaning up scenes for rendering and adding eyeballs etc.
I have only been working on Mine and Toms shots because i havnt got any of the files from the the second years, and am only working on the shots that have been OK'd by Sarah as completed.
Also this isn't counting the textures, but rendering on the occlusion/ z depth etc (which is the stuff thats gonna take longest) can be started.
So far we have:
Shot 4 - Matt - Obviously
Shot 26 - Tom - Hero's reaction to Macho Lifting the pot - Needs enviroment placement and camera setup.
Shot 27 - Tom - Lady's reaction to Macho Lifting the pot - Needs camera setup.
Shot 20 - Matt - Hero juggling for Lady - Just needs the OK from Sarah
Shot 22 - Matt - Macho pushing Hero - Need to transfer Hero's animation to the new UV'd rig, will be completed by midnight.
Shot 8 - Matt - Macho switching rocks, first draft animation done, needs feedback.
Shot 24 - Matt - Macho preparing for lift - Will be completed first thing tommorow, just needs tweaking and cleaning.
If i dont upload the completed files to the adrive 2day they will be on by midday tommorow.
I will be posting playblasts of shot 20, 8 and 22 later tonight for feedback, but right now am gonna take a bit of a break cuz i've been at it for 8 solid hours.
Thursday, 13 May 2010
Eyes.
My fault should have anticipated this. The reason why Machos eye's arn't working in the render is because they've got nothing to react too. Macho isn't lit from the front at all other than 1 fill light and the sun lights.
I can forsee two ways of fixing this, unfortunalty both involve light linking...which i'll be honest i cant make heads nor tales of and can't find a tutorial explaining how to get it to work.
1: ON the eye spheres remove all influence of all lights in the scene, Maya then creates a "ghost" default light behind the camera which the reflection should react too...this ideas a bit shaky but should work but failing that -
2:Create a spotlight behind the camera that effects the eye spheres and only the eye spheres.
Playblasts for Sunday 16th
To all animators: (Matt, Tom, Clym, Tom R and Sarah)
I will need play blasts of all your finished animations ready for Monday.
Please send these to me by Sunday 16th no later than 3pm so that i can organize the files accordingly.
Your play blasts will need to be DV-PAL format and labeled simply as the shot number e.g Shot_04 so our sound artist can lay them out correctly for the template.
If the animation is NOT complete but blocked out then this is fine to submit too, she just needs to add her sounds to the 3D animation as Pips deadline is 21st.
Thanks
Sarah
I'll be your Mr. Motivator
Play the following whilst reading the below
The finish line is fast approaching and whilst we have a few knocks and set backs, the sheer amount and quality of work were producing is nothing short of fantastic....
Matt, you've done an amazing job figuring out the the nitty gritty strange issues and problems of the project. Your modeling and texturing is a credit to the projects objectives. Your animation started out at a high quality, and has been improving time and time again.
Tom. you've come to this project as a part timer but have produced the work of a full time team member. Your consistant hard work has led to some beautiful asset models for the film and your animation goes from strength to strength with each shot you've completed for us. You are truely the artist who has grown and developed the most this year and a credit to the team.
Yaniv...again you've come to us as a part timer, but your persistence in making tweaks and alterations to Hero Gnome helped us to transform the character from 2D to the final 3D outcome. Your 1 to 1 sessions help me understand more about being a director and management and Im ever thankful for your continual support during this year.
Adam, whilst we undoubtedly have had issues I do not wish for this post to be negative and Tuesday you began to prove to me how you were gonna turn a corner for us on this project. I hope from Grigsby's knowledge and teaching you can deliver the final touches to the film to give it that sparkle. Your persistence on Tuesday to sort out the layers, mapping and sorting out the render farm scene is just what we needed. Keep up this level Adam because the team needs you on the post production.
Clym and Tom R. I must credit the professionalism of the second years work ethic. Tom your a fantastic animator who delivers a scene quickly at high standard. Try not to over-think the shot, its being delivered and your doing a great job at it. Clym your animation gets better and better as your knowledge of the rig and the character increases. Your communication with the group has been superb.
To all the second years who have contributed to the film; Fahran, Andrew, Dan you guys are going to do so well in your 3rd year and have been an absolute credit to the team. Without your assistance we wouldn't have got as far as we would have.
In short guys; what we set out to do is nearly there. While it might seem there are still hurdles ahead of us, were getting there and making something wildly different and entertaining. For everything we have made, learnt, altered, stumbled over, and overcome, we should be proud of each and everything we've done this year. This is and will be a fantastic project guys so lets put this train into overdrive and get it across that finish line.
I could not have done this film without you all.
Sarah
Wednesday, 12 May 2010
Post 101
Tested adding spheres to lady gnome and they seem to work without any issues, so i can't see any reason why she cannot have them. You just create the spheres, flatten them a bit - her eyes arn't too deep so they have to be flattened, parent them to her face joint and apply the texture.
It really is a two sec job.
The animation might look a bit funky cuz she aint supposed to be viewed from this angle (this is shot 20), also the last sec has been cut off (though it may still be processing as i post this)
Eyeballs
Macho and Hero have these eye sphere, i need to have a look at Lady, but i feel this is an important factor and is something that needs to be done, it won't take long to do and will add alot to the film. Check my blog for a with/without comparrison.
Right here whatya gotta do to get the gnomes eyeballs working. Whereas all other textures in this animation are textured lamberts which is a maya node we want a reflective surface, the best way to do these is through Mental ray nodes (textures that only work with mental ray rendering).
This is the exact texture we're gonna be using for all the eyes -
So in you hypershade right click on the drop down where it says "Create Maya Nodes" and then change the selection to "Create mental ray Nodes"
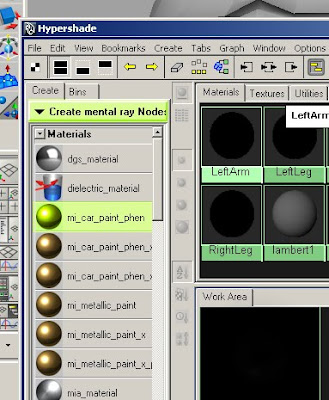 Create the mi_car_paint_phen1 node which is the first of the golden refletive ball thingies.
Rename it Eyeballs...not like i've done here.
Right here whatya gotta do to get the gnomes eyeballs working. Whereas all other textures in this animation are textured lamberts which is a maya node we want a reflective surface, the best way to do these is through Mental ray nodes (textures that only work with mental ray rendering).
This is the exact texture we're gonna be using for all the eyes -
So in you hypershade right click on the drop down where it says "Create Maya Nodes" and then change the selection to "Create mental ray Nodes"
 Create the mi_car_paint_phen1 node which is the first of the golden refletive ball thingies.
 Rename it Eyeballs...not like i've done here.
Don't worry if it comes out red, Its supposed to be at this stage.
In the attribute editor change the values to match what i have here. This should give you a nice pinpoint white specular without alot of diffuse. The red should have dissapeared from the eyeball and it should just be black and white now.
Then just apply it to the characters eye spheres -
Et Voila
Tuesday, 11 May 2010
Rocks to these Rocks.
Funny how something as simple as applying a texture to a shape can go horribly horribly wrong.
Im not quite sure what happened, as far as i can tell there is a corrupt input in the objects history and when you then parented the rock to something it effected the UVs, doing this -
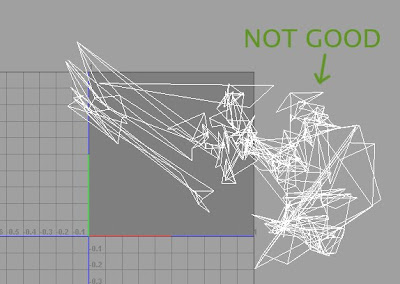 This is the same thing that happens if you create UVs on an rigged object that is already bound, but im not sure why it is effecting the rocks in this way.
Solution 1 = Delete the history - Fail.
More unknowns but if you delete the history of the rocks it does this to the rig.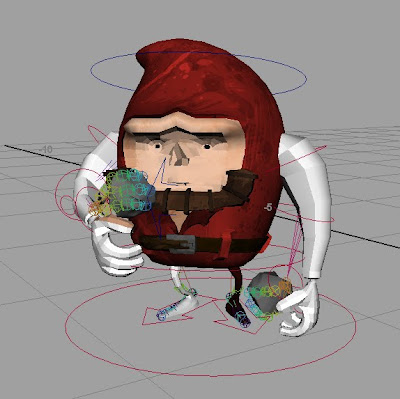 Even if you unparent the rocks from the rig and then delete the history it still effects the rig in this way.
Working solution:
Open the scene.
1. First thing you've got to do is delete the existing rocks from the scene.
2. Alongside the textures that i'm about to put onto Adrive is a file called MachoRocks.mb, import this into the scene.
3. Go to frame 32 - you should see the rocks line up with this geometry on this frame
4. Still on frame 32 parent the new rocks to the respective wrist_control joint
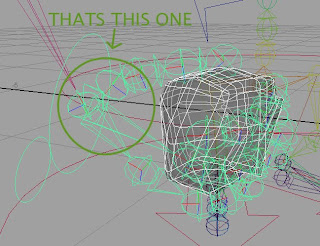 And that should fix it. Apply the texture and continue as normal.
Lemme know if theres any issues.
Edit- Right the rock textures and MachoRock.mb are on the adrive in the textures folder
Im not quite sure what happened, as far as i can tell there is a corrupt input in the objects history and when you then parented the rock to something it effected the UVs, doing this -
 This is the same thing that happens if you create UVs on an rigged object that is already bound, but im not sure why it is effecting the rocks in this way.
Solution 1 = Delete the history - Fail.
More unknowns but if you delete the history of the rocks it does this to the rig.
 Even if you unparent the rocks from the rig and then delete the history it still effects the rig in this way.
Working solution:
Open the scene.
1. First thing you've got to do is delete the existing rocks from the scene.
2. Alongside the textures that i'm about to put onto Adrive is a file called MachoRocks.mb, import this into the scene.
3. Go to frame 32 - you should see the rocks line up with this geometry on this frame
4. Still on frame 32 parent the new rocks to the respective wrist_control joint
 And that should fix it. Apply the texture and continue as normal.
Lemme know if theres any issues.
Edit- Right the rock textures and MachoRock.mb are on the adrive in the textures folder
Friday, 7 May 2010
FencePanels
Fences.
A wall of fences consits of 5 textures. There are 3 main fence panels, the posts and the bit that goes along the top.
The 3 fence panels should look like this. (the 5 boards that each of these are made of should be grouped)
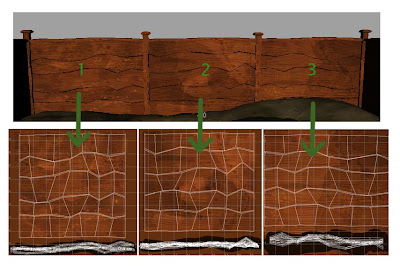 And the posts and top should look like this, each the these objects are rotated so you get a different face towards the camera and it doesnt look like its repeating.
 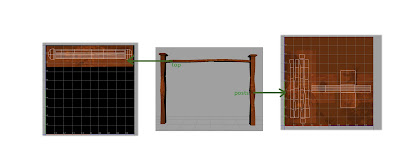 If the UV's are anything different from what you see above something's gone wrong with the file you have.
A wall of fences consits of 5 textures. There are 3 main fence panels, the posts and the bit that goes along the top.
The 3 fence panels should look like this. (the 5 boards that each of these are made of should be grouped)
 And the posts and top should look like this, each the these objects are rotated so you get a different face towards the camera and it doesnt look like its repeating.
  If the UV's are anything different from what you see above something's gone wrong with the file you have.
Thursday, 6 May 2010
Solution
Somewhere along the line the UVs have gone funny and expanded outside the texture.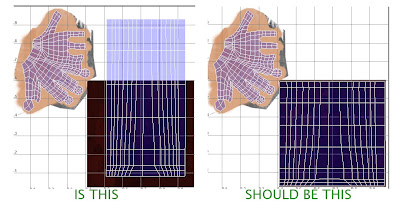
This is quite literally a 30sec fix, just scale the UVs down and move them so that they fit square over the texture. I'm more than a little frustrated that this has been such an issue considering its something so ridiculously simple.

This is quite literally a 30sec fix, just scale the UVs down and move them so that they fit square over the texture. I'm more than a little frustrated that this has been such an issue considering its something so ridiculously simple.
Macho's Arms
Guys i really don't know what to suggest because im not getting the problem my end. I need someone to post a screencap of the UV texture editor and a pic of the textures work area in the hypershade, or better yet upload the file which isnt working to the Adrive so i can have a look at it.
Its all well and good letting me know there a problem but if its invisble to me and i have nothing too look at i can't fix it.
Its all well and good letting me know there a problem but if its invisble to me and i have nothing too look at i can't fix it.
Adam
I really dont know what the problem you're describing is, as you can see theres nothing wrong with the textures.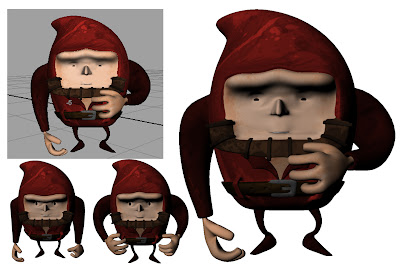 (print screen + 3 renders)
The only thing i can think of is that you're trying to apply the same texture on both arms when each arm has a seperate texture file - named rightarm.jpg and leftarm.jpg .
If its not this, post some pics on you're blog so i can see the issue, because i can assue you its not the textures.
 (print screen + 3 renders)
The only thing i can think of is that you're trying to apply the same texture on both arms when each arm has a seperate texture file - named rightarm.jpg and leftarm.jpg .
If its not this, post some pics on you're blog so i can see the issue, because i can assue you its not the textures.
Adam
Where are the rendered scene results you said you would post up last night (Wednesday 5th) between 6 and 7pm? The same stuff you were supposed to do Tuesday 4th because you didn't do it Monday 3rd??
Where is the sky dome you said you would upload to the Adrive account weeks ago.
Where is the rigged washing line you also said you would post on the Adrive account weeks ago.
You are letting the team down Adam, you have one job of rendering and there is no excuse. You promised and failed to deliver.
Tuesday, 4 May 2010
Shot 21
im blocking out this shot and more probs with the arms. Annoyingly machos arms (which are gorilla like in length) are still not long enough to do the comical hand fist smack into palm moment for this shot which is annoying cos it is such a comical element for the story. His arms would go through the geometry of his beard so doesn't look like he's gonna be able to do this movement.
Any suggestions for what we can have instead??
about as far as he can go im afraid....gutted bout this....
Adam
Need the updates for the rendering with Matt's shot asap
You were supposed to have posted this yesterday.
Thanks
Sarah
Monday, 3 May 2010
Updates
Adam
need to see an update of the render layers test with matt's shot by the end of today please so stick images up on your blog etc with times of how long rendering took so were prepared for the next few weeks.
ALL ANIMATORS
please provide updates on how your shots are going, where your up to, playblasts etc by end of today.
thanks
Sarah
Thursday, 29 April 2010
Shot 1...probs
im messing around between shots...you know how it is...and heres how it stands
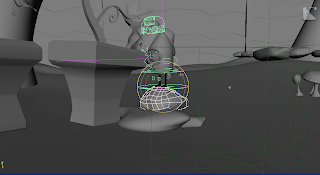 personally...think this looks ridiculous and not sure what to do about it....suggestions? i think he would need a setup so he could get to his flower but is this too much?
answers on a postcard please
Wednesday, 28 April 2010
Adam
All i gave you yesterday was the lighting tests. I've uploaded thye final animation of shot4 into the Adrive along with the textures so you can incorportae it into the scene and do some render tests.
Tuesday, 27 April 2010
26th April - 3rd May Work
Matt
finish up animation of shot 4 (mid to end Tuesday)
Your next few shots...
Shot 24
Shot 22
*****plese email me any texture stuff you did not finish so i can pass on to Andrew. What happened to the forks textures? I will be mailing my stuff off later today*****
Adam
Tuesday - collect lit and textured environment with Matt's imported animation and test the render layers with this.
Post render results - breakdown of each layer and then final composite of all no later than Thursday 28th April.
Tom the Stocker Wright
Shot 26 - Heros Reaction shot. See email with link to shot list and Animatic for reference.
JB
Sort out the texturing and dynamics of the dust/clouds used for shot 32. These will need to work for shot 35 too.
Tom R
Tuesday - review of shot 23. Please send playblast Tues eve/Weds morn for update.
Emma
Shot 11 animation.
Clym
Animate shot 31
Sarah
Finish up the button issue
Finish up L Gnome Facial Control Panel
Scale Characters
Copies on the adrives
Notifications and info to animators
Animation: Shot 18
Macho's Playing Up
Some weird and annoying computer wizardy that Maya loves to throw at us, just to watch us squirm.
It might just be in my comp but the first time i try to open Macho's file his body has dissapeared. All you need to do is reopen the file and it will have sorted itself out.
This doesnt seem to have any effect on anything, its just a pain in the bum.
Lemme know if this causes any problems.
It might just be in my comp but the first time i try to open Macho's file his body has dissapeared. All you need to do is reopen the file and it will have sorted itself out.
This doesnt seem to have any effect on anything, its just a pain in the bum.
Lemme know if this causes any problems.
1st attempt at my 1st shot
My current progress with my first ever shot for gnomes. You can't see the eyebrows well but they are moving. And i deliberately put more time at the beginning than necessary just so you can see the beinning and end better. Comments for improvement please cause this needs a bit of work...
Characters Available for Animation!
Hey Guys!
All three characters are now available for download and ready to animate. Please email me
s.verrall@rave.ac.uk
for details of how to download etc.
happy animating!
Sunday, 25 April 2010
Monday 26th April
To all,
please be in tomorow at 10:30 for updates, session with Dalli what have you. Meeting will be short sharp and sweet and then were away on working on our own bits and pieces once more.
Matt
please bring in the final textured environment tomorrow and any props that are textured as well as ones not finished as were gonna pass them over to Alexander to complete so you and I can focus SOLEY on animation. I have finished my props so he just needs to play with the bump mapping.
Adam
Once Alexander has imported the lights accordingly then your able to start transfering over your render layer tests to the real thing. PLEASE GET Z DEPTH WORKING COS THAT WOUL BE SUPER DEE DOOPER. Ask Alex Hulse why the Shadow Layer is being a complete pain in the butt so we can either cut it or sort it ready for rendering.
Cheers guys, see you then
Sarah
Saturday, 24 April 2010
an animation issue...
seriously...so i been playing with the Hero model which does NOT look any good in normal not smooth preview setting (no offense Yaniv its not a dig at your modelling) but my machine can not cope playing back animation with this character on smooth preview.
i am happy? i am sad? i am ambiguous gnome?!
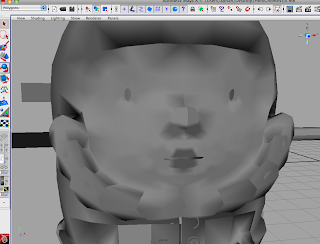
This means...i can NOT animate him on my machine as his normal face (without smooth preview) is completely unreadable. Im hoping you can playback animation on the college computers or matt or the other guys who are going to animate with this lil guy your machines have more ram than me to be able to do this otherwise we are screwed.
What I have learnt over the last few days...
smooth preview IS NOT what its cracked up to be. Without continual checking in normal mode you have no idea where those vertices are actually going because its averaging out to make the model appear smooth. This causes issues with painting weights as a lot of the geometry if unchecked is already crushed/has overlapping vertices and therefore its difficult to get rid of problematic wrinkles and creases. Its a case of going back to the model (non smooth preview) and sorting out the weights. Yes yes...smooth preview is a blessing by not adding extra geometry lines BUT your entire modeling experience should not depend on it. For something as intricate as painting weights, crushing in the fingers will give the skinner a nightmare.
i am happy? i am sad? i am ambiguous gnome?!

Friday, 23 April 2010
Adam...again
Wheres the work you said you would post on your blog Wednesday 21st April...
and the same work you said would post up last night Thursday 22nd
the same work you were set from the 7th April
3 weeks...one test of render layers...????
Thursday, 22 April 2010
Adam...
where are the render layers tests you've done? We havent seen any results yet since you started after the render meeting with Alex Hulse 7th April.
you were supposed to post these up yesterday evening (weds 21st)
We also have not had your work Dan Dalli told you to finish on the 6th April including:
-rigging the washing line
-sky dome creation
Wednesday, 21 April 2010
Thursday, 15 April 2010
This weeks objectives...
bit late posting this but we're all aware and underway with these jobs...
render layer passes tests using render farm
research into lighting
matt
texturing creation for the scene
sarah
last teething issues on the rigs sort out
painting weights and GUI setup
yaniv
finish blends
pass onto sarah to forward to Clym
clym
facial control setup for Hero Gnome
bind rig and skin weights for Hero
tom
shot 23, review of this monday 19th
Thursday, 8 April 2010
Will the Animator of Shot 32...
please post a playblast of their work by 12 (the lunchtime version of 12) 9th April. O and your tractor is currently parked on top of a pig....john deere tractor on top of a pig.
cheers
Sarah
Wednesday, 7 April 2010
More Stats...
How many shots each of the characters appear in:
Macho = 22 shots
Hero = 16 shots
Lady = 11 shots including her death and broken state...most of hers is sitting down too.
Sound Meeting Notes
Hey Guys
just taken a look at the animatic with the sound and it is looking or rather sounding rather gooooood indeed. Really can start to see it taking shape now which is excellent.
No more sound meetings organized, myself and Pip discussed what's the best option for now overlaying the sound to the final animation and we decided it was best to give Pip copies of playblasts (Quicktime) for her to integrate into the timeline and time accordingly. I've said potentially next week we could start handing over stuff (shot 4 Matt) but more likely than that week after.
Its all sounding/looking great guys so lets keep up the awesome work :)
Sarah
Tuesday, 6 April 2010
Week Objectives: Tuesday 6th-Monday 12th
Matt
animate shot 32, i need to see the majority of this animation for Friday, your not needed in college so ani mani mate like the wind.
Please provide feedback on the 2nd years work, I've already mailed Tom but would like your input as to what shots we can now give him to do.
Adam
im waiting to hear back from Alex about the rendering but for now its next Tuesday so be ready and preped
washing line - it needs to be rigged so the clothes can simply swing back/forth (not the line itself, the clothes)
lighting experiment - textures through simple scene set up, run through the render farm with simple light set up to see how the timings are looking for non HD but still widescreen.
Sarah
rigs
blendshapes - Lady
weight
sort it out
Yaniv
blendshapes - Hero Gnome
UV map the fishing rod
Dimensions
Right, firstly we're running at Pal 25 frames, timeline and rendering.
Out of Maya you want to be rendering at 1025 - 576.
And in After Effects you want to have a project setting of 720 - 576.
If i remember rightly Dan said that AE would recognise the ratio as widescreen and would automatically update itself. Either way its not something we immediately have to worry about, and we'll get him to confirm stuff before we make a start compositing.
Monday, 5 April 2010
Wednesday, 31 March 2010
major big gold stars for super happy wednesday progress!
good news everyone!!!
i just received an email from Fahran whose finished UVing the major props for our scene. I'll be sending on the character for him to complete tonight now this lot is out of the way.
Also on the major gold star front
Yaniv has finished UVing Hero Gnome! Excellent stuff. Blendshapes for this character will not begin until the weekend as Yaniv has red rock priorities but I will be creating the rig for Hero to ease the work load from him.
and on a final gold star frontage
Matt is animating...joy of joys we are meeting this weeks objectives.
This has been a good wednesday and welldone to these people for all their hard work. Lets do it guys....seriously, lets make it goooooooooooddd
Sarah :)
Subscribe to:
Comments (Atom)


